Creating your very own indoor putting green can transform any space into a personal golfing oasis, perfect for honing your skills while having fun. This guide walks you through the essential steps involved, from planning the layout and ensuring the surface is level, to selecting the right materials for a professional finish. With just a little effort and creativity, you can enjoy years of putting practice right at home.
The article will cover everything you need to know, including measuring and marking the area, building a sturdy frame, filling the base with the right materials, and installing the green itself. By the end, you’ll have a beautiful indoor putting green that invites both relaxation and competitive spirit, making it a worthwhile project for any golf enthusiast.
Planning Your Indoor Putting Green
Building an indoor putting green can be an exciting project for any golf enthusiast. Not only does it provide a space for practice, but it can also add a unique touch to your home. Let’s walk you through the steps to plan and create your very own indoor putting green, starting from the essentials of planning.
Determine the Size and Location
Before diving into construction, the first step is determining both the size and location of your indoor putting green. You’ll want to analyze the available space in your home, ensuring you choose a location that has ample room for not just the putting green, but for you to practice without obstructions. Common areas include basements, garages, or large living rooms.
Once you’ve settled on a location, measure the area to decide on the dimensions of your putting green. A common size is around 12 feet by 15 feet, but feel free to customize it based on your space and preference. Remember, the larger the putting green, the more space you’ll have for different holes and slopes.
Decide on the Slope and Elevation Changes
After settling on the size, the next step is to decide on the slope and elevation changes of your putting green. This adds an exciting challenge to your practice sessions. You can opt for a gently sloped green or a more dramatic slope.
A common practice is to create a slight uphill slope from one end to the other, allowing for realistic putting conditions similar to those found on real courses. A slope of around 2 to 3 inches over a 12-foot length works well. Think about how you want the ball to roll and set up the elevations accordingly.
Visualize the Putting Green Layout
Visualization is an integral part of the planning process. Use graph paper or a digital design program to sketch out your putting green, including hole placements, slopes, and any additional features, such as a sand trap or a fringe around the edge. This will serve as your blueprint and help ensure everything flows well together visually and functionally.
Gather Necessary Materials
Now that you have a plan in place, it’s time to gather your materials. It’s essential to have everything you need on hand before starting the project to avoid disruptions.
List of Tools Required
You’ll need a few essential tools for the construction process:
- Measuring tape
- Level
- Circular saw
- Drill
- Screwdriver
- Shovel
- Rake
- Trowel
- Chalk line
- Utility knife
Make sure to gather these tools in advance to streamline your building process.
Types of Artificial Turf to Choose From
When it comes to selecting artificial turf, you have plenty of options. Look for turf specifically designed for putting greens, as it’s made to mimic the texture and feel of natural grass.
Key features to consider include:
- Pile Height: Ideally, choose turf with a pile height between 1/2 inch to 1 inch for a realistic putting surface.
- Color: Opt for natural-looking green shades and consider whether you want a more vibrant or subdued shade.
- Durability: Look for turf that withstands foot traffic without losing its form or texture.
Selecting the Right Base Materials
The base materials you choose will significantly impact the quality of your putting green. Common materials include:
- Sand: A primary component for leveling and helping with drainage.
- Vermiculite or Portland Cement: Often used as a topping layer due to its stability and durability.
- Crushed Stone: Can also be used for drainage and provides a solid base underneath the turf.
Be sure to get enough materials to create a level and sturdy surface.
Prepare the Area
With the materials on hand, it’s time to prep the selected area for your putting green.
Clearing the Designated Space
Begin by clearing the designated space of any furniture, equipment, or debris. This will give you a clean slate to work with, allowing accurate measurements and construction. Make sure to sweep the area thoroughly and ensure it’s ready for the laying process.
Laying Down a Protective Layer
Next, lay down a protective layer. This could be a sheet of plastic or a tarp over the area. This will help prevent any staining or damage to your underlying flooring (like concrete) from sand or soil used in the filling process.
Marking Boundaries with Chalk Lines
Using a chalk line, mark the boundaries of your putting green to visualize and outline the area. This is crucial for ensuring accuracy and a neat finish. Double-check your measurements against your initial plan to ensure that everything is laid out correctly.
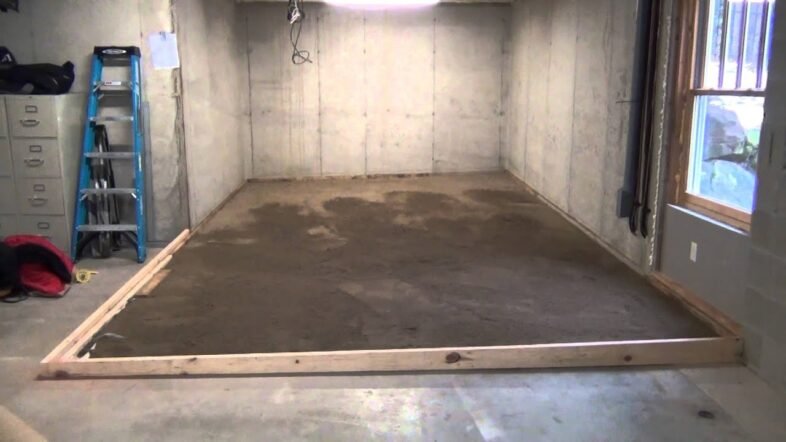
Construct the Frame
The frame acts as the structure of your indoor putting green, keeping the materials contained and providing support.
Building the Perimeter Using 2×8 Boards
Start constructing the frame using 2×8 boards, which will provide solid support for your green. Cut the boards to the appropriate lengths based on your dimensions.
Ensuring the Frame is Square with Measurements
Once the boards are cut, use your measuring tape to check that the frame is square. Measure the diagonals from each corner – they should be equal to ensure a perfect rectangle. Adjust as necessary to get everything aligned correctly.
Securing the Frame to the Floor
To make sure your frame stays in place, secure it to the floor using screws or anchors. This step ensures that the frame will withstand any pressure as you work on and play on your green.
Establishing the Slope
With your frame in place, it’s time to establish the slope necessary for your putting green.
Measuring and Creating the Desired Slope
Using a level, begin measuring from your benchmark location, commonly set at one corner of the green. Gradually add or remove material in areas where you need elevation to achieve the desired slope.
Adjusting Height Increments Across the Surface
As you adjust the height, make sure to check for consistency across the surface. A slight incline can throw off your putts, so take your time ensuring smooth transitions.
Using Sand for Base Leveling
Once you have your slope established, use sand to fill in the base. This will not only create a level surface but also improve drainage. Remember to pack the sand firmly to prevent settling later.
Installing Side Rails
Side rails are key to helping control the movement of the golf ball, preventing it from rolling off the putting green.
Cutting the Boards to the Desired Length
Using your 2×8 boards, cut additional pieces to create the side rails for your green. Ensure that these are cut accurately according to your dimensions as they will provide the top edge of your putting green.
Creating a Lip to Prevent Ball Roll-off
You’ll want to create a lip by attaching the side rails slightly above the surface of the turf. Ideally, a one-inch lip around the perimeter will prevent the ball from rolling off during play.
Securing the Side Rails to the Frame
Finally, secure the side rails to the frame with screws, making sure they’re firmly in place and will withstand any force from balls rolling against them.
Filling the Base
With the frame and side rails done, it’s time to fill the base for the turf.
Choosing the Right Mixture of Vermiculite and Portland Cement
For a durable surface, a mixture of vermiculite and Portland cement is recommended. This mix provides stability and like a solid base, can be easily worked to achieve smoothness.
Creating a Level Surface for the Turf
After mixing the base materials, begin spreading them evenly across the surface inside your frame. Use a trowel to create a smooth and even surface, which is crucial for an excellent putting experience.
Packing the Base Materials Properly
Make sure to pack down the base materials firmly to further ensure stability. Avoiding any air pockets is important, as they can lead to unevenness later.
Laying the Artificial Turf
Now for one of the most exciting parts: laying the artificial turf!
Calculating the Amount of Turf Needed
Using your framed area as a guideline, calculate the amount of turf needed to cover the surface. Remember to consider any additional pieces needed for the holes you’ll cut later.
Cutting Turf to Fit the Prepared Area
Once you receive the turf, carefully cut pieces accordingly to fit the entire area, leaving allowances for the sides.
Securing the Turf in Place
After cutting, place the turf section and secure it within the frame with appropriate adhesive or nails designed for artificial grass.
Creating the Holes
The final touch for your indoor putting green is creating the holes.
Determining Hole Placements for Practice
Decide where you want to place the holes. Commonly, having 3 or 4 holes on the green will allow for varied practice angles and shots. Make sure to space them out evenly across the area.
Cutting Out Holes for Cups with Precision
Using a utility knife, carefully cut out the turf where the holes will be. Make sure to follow the measurements precisely to keep everything uniform.
Ensuring Cups Sit Flush with the Turf
Once the holes are cut, place the cups in position ensuring they sit flush with the surface of the artificial turf. This will allow a seamless experience while putting.
Conclusion
Creating your indoor putting green is not only a fun and engaging project; it also culminates in a space where you can hone your skills right in your home. You’ve gone through the planning, preparations, and installation stages—now you can enjoy your perfect putting green!
Using this space will naturally improve your putting skills, and remember, you can always make adjustments or add custom features to enhance your personal layout. So, grab your putter, invite your friends for a few rounds, and let the joyful practice sessions begin! Happy golfing!

