Creating an indoor putting green can be a fantastic addition to your garage, especially during cold, snowy winters. This project not only provides a space to practice your putting skills but also adds a fun DIY element to your home. The build features adjustable slopes, allowing you to customize your practice experience and keep things interesting.
In this article, you’ll discover the materials and steps needed to construct a ten-foot-long putting green using simple tools and supplies. From building the frame and integrating adjustable slopes to laying down turf, each stage brings you closer to enjoying a realistic putting experience right at home. Get ready to elevate your indoor practice sessions and impress your friends with your handy work!
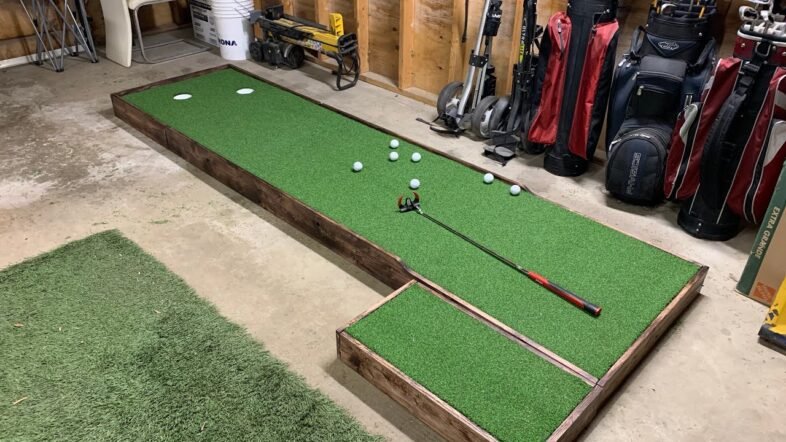
Building Your Own Indoor Putting Green with Adjustable Slopes
Creating your very own indoor putting green can be a fulfilling and enjoyable DIY project. Not only will you get to practice your putting skills right at home, but you can also customize the design to suit your space and style. This guide will walk you through the various steps involved in building a putting green with adjustable slopes, ensuring you inspire your passion for golf all year round.
Choosing the Location
Assessing Space in Your Home
Before diving into building your putting green, the first step is to assess the available space. Do you have a garage, basement, or spare room that could accommodate a 10-foot long surface? Remember, not only do you need the length for the putting green, but you’ll also want some room around it for maneuverability and a comfortable putting experience. Ideally, the chosen area should be somewhat free of clutter and allow for a clear line of sight while you practice.
Considerations for Lighting
Lighting can significantly impact your practice sessions. Choose a spot that receives natural light during the day or where you can install bright artificial lighting for evening putts. Avoid shadows that may mislead your perception of the green’s surface. Proper lighting will improve your practice experience and helps create a motivating atmosphere that invites you to play more often.
Proximity to Other Activities
Consider how your putting green will fit into the rest of your life. If you have kids or pets, make sure it’s located away from high-traffic areas where it could become a distraction or be damaged. Also, think about your other hobbies or activities: placing it near your home gym or entertainment area might encourage you to take a quick break and practice your putting.
Materials Required
Essential Building Materials
Getting the right materials for your project is crucial. The primary components you’ll need include:
- 2×4 boards for the frame structure
- Plywood for the putting surface; choose flexible yet sturdy options
- Golf cups and screws to secure them
- Trim pieces to clean the edges
By gathering these essentials, you set the stage for a smooth building process.
Recommended Tools
Having the right tools will make the construction much easier and more enjoyable. You’ll need:
- A saw (circular or miter) for cutting wood to size
- A drill and drill bits for making screw holes
- A hammer and nails for securing the frame
- A level to ensure your putting surface is even
- A measuring tape for precise dimensions
Optional Accessories for Enhancement
If you want to go the extra mile, some accessories can enhance your putting green experience:
- Indoor turf for a realistic putting surface
- Lights for enhanced visibility
- Alignment aids to help with practicing techniques
- Turf glue for a secure bond between the wood and turf
Designing the Layout
Determining Dimensions
After selecting your location and materials, sketch out your design on paper. A 10-foot long putting green can be customized to fit your space and comfort. Measure the area before finalizing dimensions to ensure there’s enough space for you to practice effectively.
Sketching the Plan
Once you have a rough idea of the size and shape, sketch out your plan. Design elements can include the number of holes, adjustable slopes, and how the overall aesthetic will look. Visualizing the final product will help you stay organized throughout the building process.
Incorporating Adjustable Slopes
One unique aspect of your DIY putting green is the adjustable slope feature. Integrate this into your design by marking areas where you’d like to create sloped sections. This added element will not only make practicing more challenging but also more engaging over time.
Building the Frame
Cutting the Wood to Size
Now it’s time to get hands-on! Start by cutting your 2×4 boards into the necessary lengths based on your original measurements. Ensure that your cuts are straight and accurate to avoid any wobbling in the finished product.
Assembling the Base Structure
After cutting, assemble the base structure by attaching the pieces to form a rectangle or any other shape you desire. Use screws to secure the joints effectively. While you might face some warping with the wood, don’t worry; adding weight later can help flatten it out.
Reinforcing the Frame for Stability
Stability is crucial for the success of your putting green. Add internal bracing to the frame to reinforce it. Double-check that everything is level and sturdy before proceeding to the next step.
Creating the Adjustable Slope Mechanism
Choosing the Right Hinges
As part of your adjustable slope mechanism, select sturdy hinges that can withstand constant movement. Heavy-duty hinges are the best choice, as they’ll provide the durability needed for regular use.
Designing the Slope Adjustment System
Plan out how you’ll set up the slope adjustment system. You may want to create a lever system for quick and easy adjustments. Make sure that the design allows for a simple yet reliable method of changing the slope as you practice.
Testing the Mechanism’s Functionality
Before permanently securing everything, conduct a test run of your adjustable slope mechanism. Make sure it operates smoothly and allows you to easily change the incline. Adjust as needed to refine your design.
Laying the Putting Surface
Selecting the Appropriate Plywood
Once you have your frame ready, it’s time to choose high-quality plywood for the putting surface. Ensure that it’s both flexible for slopes and sturdy enough for a consistent putting experience.
Attaching the Plywood to the Frame
Using glue and nails, attach the plywood securely to the frame. Take special care to avoid any warps, as a flat surface is critical for accurate putting. Pay attention to the edges to ensure a clean and neat appearance.
Smoothing the Surface for Consistency
After the plywood is secured, give it a good sanding to create a smooth surface. This step is essential for reducing any imperfections that could interfere with the smooth roll of the golf ball.
Installing the Golf Cups
Choosing the Placement of Holes
Deciding where to place your golf cups will add variety to your practice. Consider placing one or two holes, offset for varied angles. The placement should also allow for different putting distances.
Securing the Golf Cups in Place
Once you’ve marked the holes, cut out the necessary openings in the plywood. After that, secure the golf cups in place, ensuring they fit snugly and won’t move with use.
Adjusting for Various Skills Levels
If you want to make it even more engaging, consider adjusting the depth or angle of the golf cups to cater to different skill levels. This way, you can enjoy playing with family or friends, offering challenges suited to everyone’s abilities.
Adding Turf
Selecting Quality Turf
Choosing the right turf can make all the difference for your indoor putting green. Look for high-quality, realistic turf that mimics the feel of a real putting green. The right fabric not only enhances gameplay but also adds visual appeal.
Gluing Down the Turf Properly
Thoroughly glue the turf onto the plywood surface, ensuring a tight bond. Be methodical with your application to avoid bubbles or wrinkles, which could disrupt the ball’s roll.
Trimming Excess Turf for a Clean Finish
After the turf is glued down, carefully trim any excess material from around the edges. This not only gives your putting green a polished look but also prevents fraying in the future.
Finishing Touches
Adding Trim and Borders
To give your putting green a finished appearance, consider adding trim around the edges. This can enhance its sturdiness while making it look stylish. Choose colors or styles that match your home’s aesthetic for a cohesive look.
Sanding and Staining the Frame
For a final touch, sand down any rough spots on the wooden frame and consider staining it to your preferred color. A darker stain can add a rustic look, while a lighter one may provide a modern feel.
Final Adjustments for Appearance
Once everything is in place, take a step back and examine your work. Make any necessary adjustments to ensure that everything looks cohesive and appealing.
Conclusion
Reflecting on the DIY Experience
Congratulations! You’ve successfully created your very own indoor putting green with adjustable slopes. Take a moment to reflect on what you’ve accomplished. The skills you’ve utilized in planning, building, and customizing will serve you well in future projects.
Inspiration for Future Projects
Having tackled this project, let it inspire you for the next ones on your to-do list. Whether it’s building a custom shelf, crafting unique home decor, or tackling a garden project, your newfound skills will guide you.
Encouragement for Others to Try Building
Don’t keep this experience to yourself! Share your journey with friends or online communities. Encourage others to take on DIY projects and create their personal spaces. After all, nothing beats the satisfaction of building something with your own hands. Happy putting!

