Have you ever wondered how to make the most of your putting green by adding chipping areas? If you’re looking to enhance your practice space and improve your short game, incorporating chipping areas around your putting green is an excellent idea. Let’s explore how you can achieve this in a friendly and approachable way.
Understanding the Importance of Chipping Areas
You might be surprised to learn just how valuable chipping areas can be to your overall golf game. Chipping is an essential skill that can dramatically lower your score, and having a designated area to practice can lead to significant improvements in your performance on the course. By enhancing your chipping practice, you’ll feel more confident when you’re on the green.
The Benefits of Having Chipping Areas
Incorporating chipping areas around your putting green provides several benefits:
- Improved Short Game Skills: Regular practice in designated spaces can help hone your touch and precision.
- Versatility in Practice: You can create different lies and scenarios to simulate actual game conditions.
- Confidence Boost: The more you practice, the better you’ll feel about your ability to make those critical short game shots.
Types of Chipping Areas
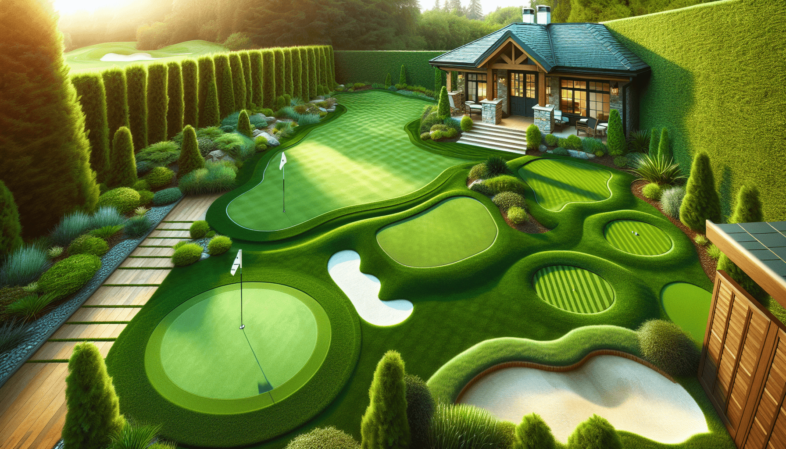
When it comes to chipping areas, several types can complement your putting green. Knowing these will help you decide what fits your space and goals:
- Flat Chipping Areas: These are straightforward and provide a good surface for practicing basic chip shots.
- Sloped Chipping Areas: If you want to challenge yourself, creating areas with slopes can simulate various lies.
- Bunker-Like Areas: Adding a sand trap or a grass area that mimics a bunker can help with specific chip shots.
- Rough Areas: Use longer grass to practice chips that require a bit more finesse.
Designing Your Chipping Areas
Once you understand the different types of chipping areas, it’s time to design them. The layout and positioning around your putting green can impact your practice significantly.
Choosing the Right Location
When selecting locations for your chipping areas, consider the following factors:
- Proximity to the Putting Green: It’s essential to have chipping areas nearby to maintain a fluid practice routine.
- Natural Terrain: Work with the natural features of your lawn. Elevation changes or existing landscaping can add character and challenge to your areas.
Determining Size and Shape
The size of your chipping areas can vary based on your available space and goals. Here are some guidelines to consider:
- Flat Areas: Aim for a width of about 10-15 feet for a flat chipping area. Length can be adjusted based on your yard’s size but should be at least 20 feet long.
- Sloped Areas: For a sloped area, you can start with a similar size to a flat area but adjust slope angles to make it both challenging and interesting.
- Bunker-Like Areas: Even a smaller space (about 5 feet wide) can serve as a replica of a sand trap for practicing those tough chips.
Adding Variety to Your Chipping Practice
To keep things interesting and beneficial, you can mix it up with different surfaces and conditions.
| Surface Type | Benefits |
|---|---|
| Grass | Mimics the course’s natural conditions |
| Sandy soil | Helps with bunker shots |
| Artificial turf | Consistent surface for year-round practice |
Utilizing a variety of surfaces can better prepare you for whatever you’ll face on the course.
Building Your Chipping Areas
Now that you’ve planned your chipping areas, it’s time to get to work! You don’t need to be a professional landscaper; you can create these areas yourself with a little time and effort.
Materials You’ll Need
Gather the following materials to help with the construction of your chipping areas:
- Shovel and Rake: For leveling off areas and moving materials.
- Grass Seed or Turf: Choose a type that mimics your desired chipping conditions.
- Soil: To fill and create elevation changes if needed.
- Measuring Tape: To ensure your dimensions are accurate.
Step-by-Step Process
- Mark the Area: Use stakes and rope or spray paint to outline where you’ll create your chipping areas.
- Clear the Space: Remove any debris, grass, or obstacles in the designated area.
- Level the Ground: Use a rake to smooth out the area, making sure it’s even where necessary.
- Add Soil for Slopes: If you’re creating slopes, you can raise certain sections with additional soil.
- Plant Grass Seed or Lay Turf: Choose the right time for planting grass seed according to your region’s climate or lay your turf down flat.
Tip: Water the areas adequately, especially if you opt for seed.
Maintenance of Your Chipping Areas
Once you’ve built your chipping areas, regular maintenance is key to keeping them in good shape.
- Mowing: Keep your grass at a consistent height for optimal performance.
- Watering: Ensure your chipping areas receive enough water, especially during hotter months.
- Weed Control: Periodically check for weeds that may disrupt your practices.
Practicing with Purpose
Simply having chipping areas isn’t enough—you’ll want to practice smartly to see the best results.
Setting Goals
Before you hit the chipping areas, think about what you want to achieve. Clear goals can help shape your practice sessions. Consider goals such as:
- Lowering your average chip distance to the hole
- Increasing your consistency with different clubs
- Reducing the number of putts needed following a chip
Drills to Improve Your Chipping
It’s helpful to incorporate specific drills into your practice to target your weaknesses. Here’s a list of a few helpful drills:
| Drill | Purpose | Instructions |
|---|---|---|
| One-Handed Chipping | Improves touch and feel | Chip with one hand at a time to build awareness. |
| Target Practice | Increases accuracy | Set up targets at varying distances and chip towards them. |
| Up and Down Drill | Reinforces pressure situations | Start from a specific spot and see how quickly you can chip and putt in two strokes. |
By focusing on these drills, you’ll build confidence in your chipping game.
Connecting Chipping Practice to Your Putting Green
Think of your chipping areas as an extension of your putting green. Practicing your chips in various conditions helps create a seamless transition from chipping to putting.
Creating Game-Like Scenarios
You want your practice to reflect actual play as much as possible. Create scenarios that mimic the golf course by practicing from the edge of your putting green to different holes.
Evaluating Your Performance
After practicing, take time to assess your performance. Consider keeping a practice journal to jot down insights, track improvements, and modify your drills as necessary.
Conclusion
Incorporating chipping areas around your putting green can significantly enhance your practice routine and overall game. You’re not only creating an opportunity for improvement but also enjoying the process of becoming a better golfer. With careful planning, some dedicated effort, and consistent practice, you’ll find that your short game sharpens remarkably. So, get started on those chipping areas, and witness your golf game rise to new heights!

