Creating an indoor putting green at your academy can elevate the golfing experience for everyone involved. This article shares the journey of constructing a raised putting green, detailing each step of the process with insights from skilled carpenter Ben. From the framework to the final touches, you’ll discover the meticulous work that goes into making a top-notch practice area.
Join in as you explore the transformation of an empty space into a vibrant putting green, complete with AstroTurf designed for a smooth roll. You’ll also gain tips on what to consider during construction and witness the excitement of seeing it all come together. Whether you’re a golf enthusiast or just curious about the process, there’s plenty to enjoy in this engaging build.
Indoor Putting Green Construction at Your Academy
Overview of Indoor Putting Green
Purpose of the Putting Green
Building an indoor putting green at your golf academy serves multiple purposes. Primarily, it creates a dedicated space for golfers of all skill levels to practice their putting techniques in a controlled environment. Unlike outdoor greens, an indoor putting green is unaffected by the weather, allowing for year-round use. It also provides your academy with a unique selling point, as it can attract more students eager to improve their skills. The aesthetic appeal of a well-constructed green can enhance the overall appearance of your academy, creating a welcoming and professional atmosphere.
Benefits for the Golf Academy
Having an indoor putting green can significantly benefit your academy. For starters, it offers consistent conditions for practice, helping students to hone their skills without distractions that variable weather conditions may cause. Additionally, it enables instructors to conduct focused lessons, providing focused feedback in real time, which can speed up the learning process. The indoor green can also be used for hosting events or competitions, further engaging your community and possibly generating additional revenue.
Overview of the Construction Process
The construction of an indoor putting green involves several stages, beginning with planning and design. You’ll select an appropriate location, followed by consideration of design features and dimensions. Once the site is prepared, the framework will be built, followed by the installation of the plywood surface and astro turf. Finally, finishing touches will be added to ensure the green looks great and functions perfectly. Each step requires careful consideration and the right materials to achieve a high-quality end product.
Planning and Design Phase
Selecting the Location
Selecting the location for your indoor putting green is a critical first step. You’ll need enough space to fit the green comfortably while ensuring enough room for golfers to practice their stance and swing. Ideally, the area should be well-lit and accessible for visibility and convenience. You might also consider the proximity to other facilities, such as restrooms or lounge areas, to enhance the experience for your students.
Design Considerations for the Putting Green
When designing your putting green, several considerations should come to mind. You’ll want to take into account the size of the green, the slope and undulation, and the types of holes you plan to include. Different shapes can provide varied experiences, so consider your audience when making design decisions. Additionally, think about how the surface will affect putting dynamics; a well-constructed green should simulate conditions found on real courses.
Dimensions and Layout Specifications
For a practical indoor putting green, common dimensions can range from 2 meters wide and 4.5 meters long, even larger, depending on your available space. The layout should incorporate one or more holes, allowing for varied putting practice. Additionally, plan for a slight elevation to ensure the proper ball roll and to prevent balls from falling off the edge, enhancing the overall functionality of the green.
Materials Required
List of Necessary Materials
Creating your indoor putting green requires specific materials, including:
- Pressure-treated timber for the frame
- WBP plywood for the surface
- Astro turf designed specifically for putting greens
- Screws and glue for securing plywood
- Resin for hole cut-outs
- Trim for finishing edges
Source Options for Materials
You have various options for sourcing these materials. Local building supply stores typically carry pressure-treated timber and plywood, while specialized turf suppliers will offer a choice of astro turf specifically for putting surfaces. For finer materials like resin and trim, consider home improvement centers or online providers who can deliver.
Cost Estimation for Materials
Estimating the costs involved in constructing an indoor putting green can vary based on the materials selected and the size of the project. Generally, budget around $500 to $1,000 for basic materials, including wood, plywood, and turf. This estimate can adjust based on additional features, custom orders, and market prices at the time you purchase your materials.
Construction Team Composition
Role of the Carpenter/Joiner
A skilled carpenter or joiner plays a crucial role in the successful construction of your indoor putting green. They are responsible for building the framework that will support the entire structure, ensuring it is robust enough to eliminate any movement when golfers practice. Their expertise will impact the overall quality and longevity of the putting green, making their involvement invaluable.
Involvement of Academy Staff
As the academy owner, your involvement in the construction process can vary. Close collaboration with the carpenter is beneficial; your insights regarding design preferences and specifications will ensure the final product aligns with your vision. Additionally, enlisting the help of academy staff during the preparation and installation phases can foster teamwork and a sense of ownership over the new facility.
Safety Measures During Construction
Safety during construction cannot be overlooked. Make sure that anyone on-site wears appropriate safety gear, including goggles, gloves, and sturdy footwear. Establish a clear work area to minimize the risk of accidents and ensure that tools are safely operated and maintained. Everyone involved should be aware of emergency procedures in case an incident occurs during the build.
Preparation of the Site
Clearing and Leveling the Area
Before any construction can begin, the area designated for the putting green must be cleared of any debris or obstacles to provide a clean working space. Leveling the ground is essential, as it will create a stable foundation for the green. This process often involves removing sod, rocks, and other obstructions and then grading the area to ensure proper drainage and a smooth surface.
Foundation Requirements
Once the area is cleared and leveled, a solid foundation must be constructed. This typically involves building a frame from the pressure-treated timber selected earlier. The foundation provides stability for the entire structure and ensures that the green maintains its shape over time, so investing time in this stage will pay dividends in the longevity of your indoor putting green.
Setting Up Temporary Structures
Depending on the complexity of the construction, you may need to establish temporary structures like scaffolding or support beams. These can assist in securing the framework during construction, allowing for an organized workspace. Ensuring that these temporary setups are secure will contribute to overall safety and efficiency as work progresses.
Building the Framework
Choosing Timber for the Base
The choice of timber for the base of your putting green is critical to its durability and structural integrity. Pressure-treated timber is a popular choice as it can resist rot and damage from moisture, making it suitable for indoor settings. You will want to select timber that is strong enough to support the weight of the green, which will prevent sagging or movement over time.
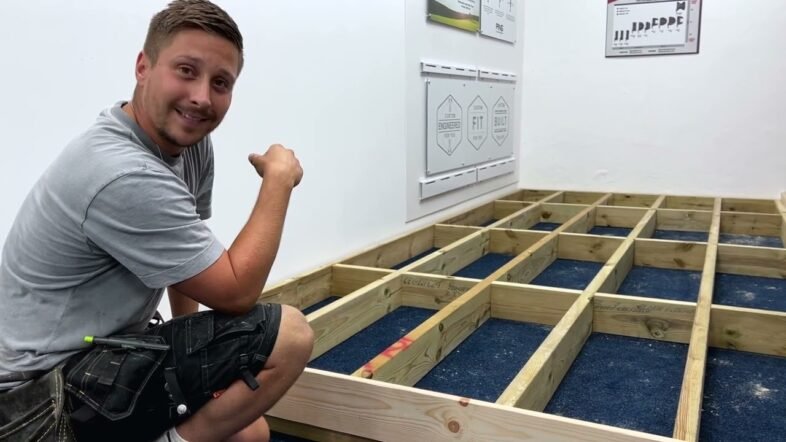
Construction of the Frame
Once the timber is selected, the construction of the frame begins. Using precision and care, each piece of timber is cut to size and secured in place according to the planned dimensions. This may involve using screws and glue to ensure a stable connection at each joint. The goal here is to create a sturdy frame that can support the plywood and turf surface without risk of movement.
Importance of Structural Integrity
The structural integrity of the framework is vital, as it supports the entire putting green. Any instability could cause uneven playing surfaces, affecting gameplay negatively. You might think over-engineering the frame is unnecessary, but ensuring there are additional supports and reinforcements where needed will ultimately lead to a higher-quality green that stands the test of time.
Installing the Plywood Surface
Selecting Appropriate Plywood
The next step in your indoor putting green construction is selecting the appropriate plywood. WBP (weather and boil proof) plywood is an excellent choice for its durability and resistance to moisture. A thickness of 18mm is typically sufficient to provide a solid, smooth playing surface that enhances the overall experience for golfers.
Techniques for Securing Plywood
To secure the plywood to the frame, you will generally use a combination of glue and screws. This ensures a stable bond that can withstand the repeated impact of golf balls during practice. Ensuring that the plywood is flush with the edges of the frame will contribute to a professional and seamless appearance, improving the visual appeal of your putting green.
Addressing Imperfections in the Surface
During the installation of the plywood, it’s not uncommon for small imperfections to arise in the surface. Addressing these is crucial to provide a smooth putting experience. Fill any minor dips with leveling compounds or additional supports where necessary, and always double-check the surface for any potential issues before proceeding to the next steps.
Laying Down the Astro Turf
Choosing Astro Turf for Putting Greens
The astro turf you select for your putting green significantly impacts the playability and look of the final product. Ensure that the turf is specifically designed for putting surfaces, as it should mimic the feel and roll of a natural green. Picking a product with a suitable pile height will provide the right balance of softness and firmness for excellent performance.
Methods for Installation
Installing the astro turf involves careful rolling and cutting to fit the dimensions of your plywood surface accurately. It’s best to unroll the turf and allow it to acclimatize, making it easier to work with. Once in place, you can use adhesive to secure it to the plywood, ensuring there are no noticeable seams or bubbles that could affect performance.
Cutting and Fitting Around Holes
If your putting green design includes holes, precise cutting around these areas is essential. After securing the astro turf, carefully measure and cut the turf to create clean edges around each hole. This detail will enhance the professionalism of the finished product, ensuring that the holes are functional and easy to play from.
Finishing Touches
Adding the Surround and Trim
Once the astro turf is laid down and fitted, the final step involves adding the surround and trim to the edges of the putting green. This not only enhances the aesthetic appeal but also provides additional support for the turf, ensuring it stays in place. Choose a trim that complements the overall design of your academy for a cohesive look.
Final Inspections and Adjustments
Before declaring the project complete, conduct a thorough inspection of the entire putting green. Check for any discrepancies in the turf, ensuring there are no rough edges or areas that need adjustment. This is also the time to take care of any last-minute touch-ups or fixes to ensure everything is perfect before unveiling your new facility.
Testing the Green with Practice Putts
With all construction completed and adjustments made, it’s time for the fun part: testing the green! Grab a putter and a few balls to take a few practice putts. Pay attention to the ball’s roll and response to putting strokes to gauge how effectively the green meets your expectations. This stage allows you to experience the fruits of your labor firsthand.
Conclusion
Summary of the Construction Process
Constructing an indoor putting green is a multifaceted process that involves careful planning, selecting the right materials, and executing the build with precision. From the initial design stage to installation and finishing touches, each step contributes to creating a high-quality practice space for golfers at your academy.
Reflections on the Completed Project
Once the putting green is completed, you will likely feel a sense of pride in the facility you have created. The ability to provide golfers with a space to improve their skills in a comfortable, indoor environment enhances the overall value of your academy. Observing students practice and enjoy the new feature will confirm that all the effort put forth was well worth it.
Future Plans for the Putting Green
Looking ahead, consider how you can continue to enhance the experience your indoor putting green provides. This could involve integrating technology for feedback during lessons, hosting putting contests or events, or even using the space for corporate gatherings. Your investment in the putting green is just the beginning of many exciting developments at your golf academy.

